
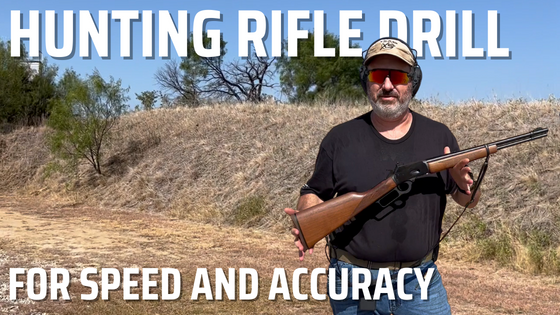
Set Your Sights On This – Hunting Rifle Drill for Speed and Accuracy
Posted by Monte Long on Sep 21st 2022
All right, it’s time to set your sights on some long gun practice!
Hunting Rifle Drill Origin
Recently, I wrote a blog on zeroing a Marlin 1894 carbine and a Ruger Gunsite Scout Rifle in preparation for helping my folks at their place and the upcoming whitetail deer season here in Texas. With both long guns zeroed, it’s time to start getting some practice in.
For this practice session, I reviewed my copy of Jeff Cooper’s book The Art of the Rifle.
For those unaware, Colonel John Dean “Jeff” Cooper was a United States Marine, historian, author, teacher, and the founder of the American Pistol Institute, more familiarly known as the Gunsite Training Academy. He was a lifelong hunter and shooting enthusiast.
The Art of the Rifle, initially published in 1997 by Paladin Press, was Cooper’s thoughts on nearly everything rifle-related. It touches on almost every subject – rifles, long gun history, zeroing, shooting positions, shooting slings, practicing/training, testing skills, and ballistics. It is an excellent resource for anyone interested in a rifle or carbine, whether for hunting or defensive purposes.
The Rifle Drill Breakdown
For this practice session, I decided that I would modify the off-hand snapshot drill from Chapter 20, “Testing and the Evaluation of Marksmanship.” The snapshot is simply a shot fired as quickly as you can get the rifle or carbine into the shoulder, find an acceptable sight picture, and press the trigger.
Cooper describes a cape buffalo hunt in Rhodesia in the book that partially inspired this test. It’s a short paragraph within the chapter, but I won’t spoil it for you.
Cooper suggested shooting the drill from the ready with the rifle loaded and on safe. For a ready position, he described the rifle being held in both hands, with the buttstock near the belt, the muzzle elevated, and the front sight between the shooter’s eyes and the target. The target that was suggested was the original IPSC Option target.
Rifle Drill Objective
For shots at 25 yards, the goal is to put a round into the 4” circle in the head in 1.5 seconds.
Five repetitions are recommended to make sure that the rifleman is consistent. Following the five reps at 25 yards, the shooter moves back to 50 yards and repeats the drill with the same 1.5-second goal, though the shooter will be aiming for the 10” circle in the body of the target.
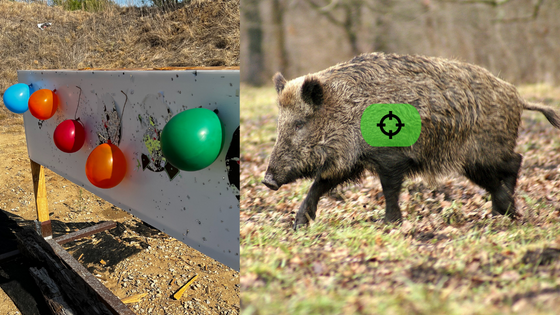
It’s a good drill, and it is one that truly tests a marksman’s ability to make an acceptable shot quickly. However, I decided to change it up, opting to use balloons inflated to somewhere between 4 and 6 inches. My goal was to establish what I could do consistently.
How did I come up with a 4-6” balloon size? Simple.
That’s on the small side of a heart/lung shot for a medium-sized feral pig, which means it’s a good, realistic-sized target to practice on.
Why balloons? Two reasons – reactive targets are more fun to shoot than paper, and, depending on how you mount them to the backer board, balloons have some movement that makes hitting them a bit more challenging.
Marlin 1894 Rifle Drill
With the Marlin, I worked at 25 and 50 yards. As I said in the zeroing article, it’s primarily intended as a carbine I can keep close at hand when I’m helping Dad work on things at his place. For quick shots on pigs or whitetails, while I’m working on fences or driving the tractor, I will probably be within 50 yards.
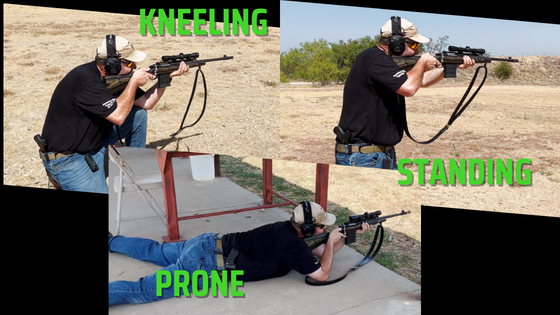
25-yard work was all done off-hand. Off-hand shooting is more realistic at that distance. At 50 yards, I shot both standing and kneeling. Sure, it’s nice to know I can make the shot standing up, but the reality is that, if you can, you should always use a position that offers better stability. The more stable you can be, the better your chances of taking the animal cleanly with a single round.
Gunsite Scout Rifle Drill
With the Gunsite Scout Rifle, I also used balloons. I decided to shoot it at 50, 75, and 100 yards. At 50, I stuck with offhanded shooting. For 75 yards, I decided to shoot from kneeling; at 100 yards, I fired from a prone position. At every distance, I started off in a standing, ready position.
Times with the Ruger were a bit slower than I’d like, but that’s why I practice. Standing at 50-yards averaged 2.12 seconds. 75-yard standing to kneeling was an average of 2.98, and standing to prone at 100 gave me an average of 6.01 seconds.
The goal in The Art of the Rifle is to make a good hit in 1.5 seconds.
That’s a good goal and is definitely achievable with some practice.
On the day of filming the video, my goal was to establish my current capabilities with both rifles in question. How did it go? Not too bad, but there’s definitely room for improvement.
Hunting Rifle Shooting Drill Results
With the Marlin, at 25 yards, I was in the neighborhood. My times ranged from a top-speed run at 1.39 to a slow run of 1.59.
The average came out to 1.505 seconds per run. Not bad, but obviously some room for improvement.
At 50 yards, I was a little slower. I maintained the same balloon size, which does increase the difficulty. My fastest run was 1.82, and my slow run was 3.27.
Why the huge disparity? I didn’t get the safety disengaged on the slow run.
I noticed I had an issue with it at 25 yards as well. That is a HUGE clue that I need to spend some time working with the 1894 in dry fire to ensure that I can consistently get the safety disengaged during presentation of the carbine.
Dry Fire Drills for Improvement
To get some dry fire in, I will start by working with no timer and moving slowly and smoothly to program the movements into my mind. Once I’m satisfied with that, I’ll begin adding time. I’ll pick a suitable-sized target (probably a 2” Shoot-N-C dot because I have them) and put it as far from where I’m dry firing as I can (which won’t be much in my apartment), and then add the time.
I’ll start with a par time of about 1.6 seconds for the Marlin. My average time at 25 yards was just over 1.5, so I want to give myself more time when I start out. Once I’m consistently getting the hammer dropped in that time frame with the front sight where I like it, I’ll start reducing the par time by .1 until I can’t consistently meet the time standard. Once I get to that point, I’ll keep working at that time until I can meet it.
I’ll have to be very aware of what I’m doing. I may ask one of my shooting buddies to watch what I’m doing to find and eliminate any wasted movement. The presentation of the carbine needs to be as efficient as I can make it.
I’ll do the same thing for off-hand shots with the Ruger, with a starting time of 2.1 seconds. The kneeling and prone will be a tiny bit different.
For kneeling and prone, I’m going to start in position and reverse out of it to a standing position.
I’ll pay attention to my natural point of aim while in position and then reverse to standing ready, so I can be mindful of what I need to do to correct that natural point of aim right off the bat. Watching the videos, I can tell I was muscling the gun into position a little bit, which does not help with speed or accuracy.
After a few reps working backward, I’ll move around the house a bit and then try it from a standing start into kneeling and prone. Once I’m consistently hitting the natural point of aim on my target, I’ll add the timer and start working with the par time. As before, I’ll start with a par just slightly slower than my actual average time and then start backing down to the point of failure.
Fall is just around the corner, and that means it’s time to get out and look for game animals. If you get out for some practice, give this a try and let us know how you did!

About XS Sights: XS Sights is known for making the fastest sights in any light. For more than 25 years, the XS team has created some of the most innovative sights on the market today for pistols, rifles, and shotguns. Whether used for personal defense or hunting, these sights are designed and built to be the absolute best for their specific purpose. American Made. Texas Proud. 2A Strong.