
DIY Glock Sight Installation with Minimal Tools
Posted by XS Sights on Aug 25th 2021
Glock sights are among the easiest pistol sights to install on your own. They also happen to be one of the first upgrades many folks make to their pistols. Contrary to popular belief, you don't need an expensive sight pusher tool or gunsmithing tools to install your own set of sights. Some specialty tools can be nice to have around if you plan to install sights more regularly. However, we are focusing on the bare bone essentials for this blog.
We'll walk you through two install methods. First, a benchtop vice install, AKA fancy tools method. Then, our budget method without a vice. When we totaled up the price of each method we didn't include the cost of some basic items that you most likely already have at home. Anything with an * isn't included in the total cost.
Like with any D.I.Y. project, the trick is to go slow and pay attention to detail. In the 25+ years we've been in business we've learned a few tricks to help with installing your sights. Remember, you can always remove more material, but you can't add it back! Be sure to use moderate hammer strikes and be careful not to hit your slide or fingers. If you hit a snag, call our tech line for help! And finally, remember you can NEVER use too much Loctite!
What's Included?
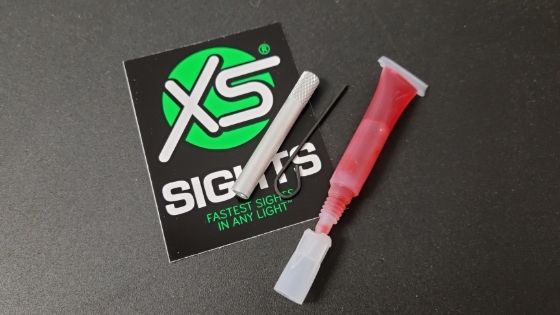
With your purchase of most Glock XS Sights products (excluding Minimalist and 3-Dot Night Sights) you will find a front sight install tool, a tube of Red Loctite, and an Allen wrench (if applicable) in the packaging with your sights.
Benchtop Method Installation
In this method we're assuming that you already have a benchtop vice at home, therefore we don't include that in the total cost. You'll also notice that we went pretty cheap on the tools we did buy, including a gunsmithing punch set. It's not wholly necessary to have one, but it's a nice convince if you're willing to spend a little $$.
Required Tools – Benchtop Install Method:
Estimated Cost: $40 to $60
- Wheeler Engineering Gunsmith Punch Set ($30 - Amazon)
- Flat 6" File ($8 - Home Depot)
- Nylon Vice Jaws ($12 - Amazon)
- Pliers* — This tool is only needed if the front sight is pinned or if you are removing old night sights that have already been installed with Loctite.
- Q-tips or Paper Towel*
- 70% Isopropyl Alcohol* — Any alcohol solution will work (gun scrubber and brake cleaner are common options)
- Vice*
- Pencil*
- Ruler*
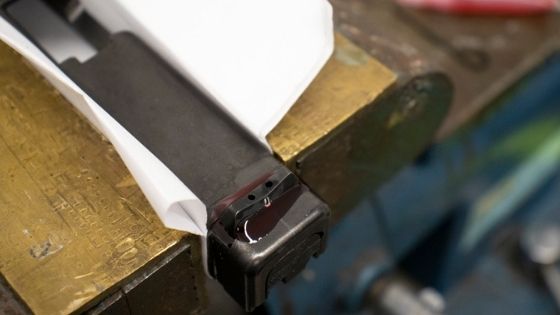
In the benchtop install video, we featured DXT2 Big Dot Night Sights. Our Big Dot rear sight for Glock pistols are designed for slip fit installation. The two set screws will hold the sight in place, while the Loctite cures to keep the sight in place permanently. One major benefit of slip fit sights is that the installation is super easy! If you don't include the Loctite curing time, you can generally install these in under 15 minutes. Sometimes you don't even need a hammer to drive out the factory sight!
We supply most of the tools needed saving you time, money, and effort. The trick to installing a set of sights that will go 10,000+ rounds is to properly degrease all the contact parts (on the slide and sight), use plenty of Loctite, and let the set cure overnight before cleaning or oiling the gun. Be sure to oil your pistol and sights after completing an install, this ensures that you maintain the blueing and it will be less likely to rust. It also ensures that you're properly caring for the finish of your firearm.
Budget Method Installation
Our goal with the budget install method was to use as many everyday items as possible. This alleviates the need to buy a ton of one-time use specialty items.
Required Tools - Budget Method:
Estimated Cost: $25 to $30
- 6-Inch 100 Lbs. Trigger Clamp ($10 - Home Depot)
- Hammer ($8 - Home Depot)
- Flat 6" File ($8 - Home Depot)
- Nylon Spacer 1/2" Dia. X 1" Length ($0.50 - Home Depot)
- 70% Isopropyl Alcohol* — We used Lucas Oil Contact Cleaner, but most any alcohol-based substance will work
- Old Towel*
- Pliers*
- Q-tips or Paper Towel*
- Pencil*
- Ruler*
Our R3D Night Sights were installed with the file to fit the method. This is our preferred install method. It is usually just as fast as using a pusher tool for an experienced person. Our biggest tip for this type of installation, especially with minimal tools, is to file material off slowly and make light, precise hammer strikes. We use blued steel instead of hard coated or anodized steel. This lets you file material off easily to get the proper fit. another benefit of the file to fit method is that it allows for fine-tuning and variability between the differing years and Glock production models. When hammering the sights into place hit sight on the dovetail, not the lamps! Be sure to line it up correctly before you start hammering away. Hitting the dovetail will help funnel the force to the important area, the area we want to move. R3D Night Sights are our most difficult set of sights to install. The dovetail is slightly over-sized for sight pusher tools, but we chose to install this set using the budget method to show just how easy installing your own sights can really be! All it requires is time, patience, and a few hand tools! Remember, be sure to oil your pistol and sights after completing an install, this ensures that you maintain the blueing and it will be less likely to rust. It also ensures that you're properly caring for the finish of your firearm.
Maintenance Tip: After the Loctite has cured overnight, coat the sights and slide in a small amount of oil. Our sights are blued steel and need oil to help prevent rusting. The ability to file to fit is a trade-off with blued steel over carbonized surface treatments. A little oil goes a long way in caring for your sights!
Note for Sight Pusher Installs
When using the sight pusher install method be sure to press on the meat of the sights dovetail NOT ON THE BLADE unless there's no other option. If it takes too much pressure to turn the pusher you should STOP! It shouldn't be hard to install and you should only have to apply a moderate amount of pressure. We only recommend this install method for our R3D Night Sights if you have a pusher available.
Install FAQ's & Tips
One of the most common questions our tech line receives is: How do you know if the sight is perfectly centered on the slide? Luckily, there are three easy ways to ensure the sight is centered correctly.
- Eyeball it. This honesty works the best, you may be surprised at how well your eye can align an object to center.
- Mark the center of the slide and sight with a pencil.
- Use calipers to ensure the empty dovetail space is even on both sides of the sight.
To ensure proper centering on the slide, we recommend placing the slide on a table with the sight installed and take a few steps away from the table. After taking a step back it is easy to see if the sight is massively off-center. Think about hanging a picture frame on a wall; from a few feet away, it is reasonably easy to tell if the frame is level or not, but not as easy to see if you are standing directly under the frame.
One thing to note: installation is usually pretty easy, recognizing deviations during install is trickier!
Yes, you should Do It Yourself!
We at XS, are shooters and tinkerers. We encourage everyone to try installing their sights if they have basic tool handling experience. It's a good skill set to add to your arsenal and can help you learn more about your pistol. We keep all our install methods low cost so it's something simple and inexpensive for you to tackle at home on your own. If you get stuck, call our tech line and we will happily walk you through it.
For more information about installs or our sights, visit xssights.com or call 888-744-4880 to speak with one of our knowledgeable and helpful customer service technicians today!
XS Sights is known for making the fastest sights in any light. For more than 20 years, the XS team has created some of the most innovative sights on the market today for pistols, rifles, and shotguns. Whether used for personal defense or hunting, these sights are designed and built to be the absolute best for their specific purpose. American Made. Texas Proud. 2A Strong.